Wednesday, December 28, 2011

The Exceptionally Festive Dress

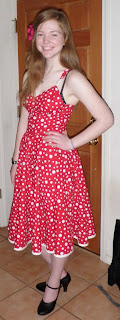
This is the dress I made for Christmas this year. I used Simplicity 2176. I used 100% cotton Christmas fabric I found on clearance at Jo-Anns.  Instead of hemming the bottom I used white bias tape. 


I designed and crocheted my little white shrug.  
(I was dramatically eating chocolates while Mom was taking pics.)


Back view. Next time I will use an invisible zipper. On this dress it blended well with the main fabric, but really popped out at the contrast band.

I am very happy with the fit of the bodice. I was not so excited about the drape of the skirt. I think I need to use a more flowy fabric next time. Overall I am pleased with the finished product.

I am such a nerd =)


I was quite happy to have an excuse to wear a pair of cute shoes and show off my snowflake toenail polish!


Sunday, December 18, 2011

The Seamless Pledge... Except for Underwear


Taken from: http://seamlessblog.wordpress.com/the-pledge/


THE RULES

  1. No buying new clothes for the duration of your pledge. By new, I mean any new mass-manufactured clothes.
  2. You can buy second-hand manufactured clothes – so be prepared to get to know your local charity shops awfully well.
  3. Vintage clothing is a-ok!
  4. Anything you’ve made by hand is definitely allowed. Get your sewing machines and your knitting needles out, because handmade is definitely in!
  5. Get involved! Join in on the Flickr group and like our Facebook page. I’ll be looking to feature pledgers on the blog in the future. I’d love to see your second-hand finds, refashions and hand-made creations!
I, Brittany Cole, take the Seamless pledge until 3/31/2012. I will abstain from buying any new clothes until the end of my pledge. I will find ways to be fashionable without breaking the bank and without contributing to the cycle of fast fashion consuming the high street. I will trawl through charity shops, I will attend clothes swaps, I will look for second-hand items on eBay and I will craft my own clothes with my own two hands. 


I am going to take this pledge for my clothes. However, I am still going to buy new clothes for Billy and Brian. I will try this for 3 months and see how it goes. I don't think it will be to difficult for me because I already get most of my clothes at thrift stores anyway. I also love to make my own clothes. So here goes!

Rose's "It's Not a Date" Dress

I drafted and sewed this dress for Rose to wear on her "not date" with her "not boyfriend." It is made from 100% cotton polka dots fabric from Hobby Lobby. It is actually Christmas fabric that was on clearance for $3.50/yard. The dress used 3 yards. It has a full circle skirt and a fitted bodice.


The bust is a wee bit big at the sides but it is not to bad. I will have to tweak it a but for the next version. Overall I am happy with it, considering it is the first pattern I have ever drafted.

Thursday, November 17, 2011

Crafting

I am so happy that I am finally getting into a regular routine with Billy. I can even make time to craft! I sewed 2 dresses. One I designed myself and the other is Simplicity 2176. I will post pics as soon as I can get Brian to pin the straps so I can sew them on the back. Other than that they are complete. I also need to make a petticoat for the red dress with white polka dots because the full circle skirt does not hang properly. I have found a few good looking tutorials and I also have a Simplicity pattern that has a petticoat. I am not sure which one I will use yet though.

Wednesday, November 2, 2011

Halloween Costume!

I made Billy's Halloween costume. It was a blast. I made the mad scientist lab coat by altering the Kimono Wrap pattern. I made the pants using Simplicity 3711. I bought the little white shoes at Wal-Mart for $5. I bought toddlers swim goggles and painted them using non-toxic acrylic paints. It didn't work very well because the paint started to peel off. It didn't really matter though because Billy didn't want to wear them for long anyway. At least we got a picture.

Dr. Horrible and Captain Hammer!

Sunday, October 23, 2011

Star Trek Shirt

So cute!

Thursday, July 14, 2011

Introducing Mr. William Norman Cole

Our little Munchkin finally arrived on Thursday, July 7, 2011 at 4:43 PM. He is prefect! More later!

Wednesday, July 6, 2011

Still No Munchkin...

Sigh.

Saturday, July 2, 2011

Bloomers!

I actually completed my first project off my long sewing project list page! This morning I made bloomers with some cotton fabric I found at the thrift store yesterday. 4 yards for $3.99. Not too shabby. I used this tutorial on Youtube.com by Evange. She has a bunch of great stuff. You should definitely check her out.


These bloomers are absolutely cool and comfortable. I will not post a pic of me modeling them because, frankly, bloomers do NOT look cute on pregnant women. We don't need help looking poofier than we already are. Haha.


I decided that the bottom of the bloomers needed ruffles. I used the same basic measurements as the video describes but I used 1/4" elastic.  I folded over 1/4" then up 1 3/4" and pressed. Then I edge stitched along the top of the casing, leaving 1" open for running elastic through. I then stitched again 1/2" down from my first stitches to form the casing. If this is not clear and someone would like to try and make ruffly bloomers, please email me and I will try explain better. I fed the elastic through and pinned. Then you would finish by sewing the elastic together and sewing the casing closed.  I did not finish off the elastic or the seam casings because I want to adjust the elastic lengths once I have the Munchkin and return to a more normal size.  A 42"waist is not a normal size for me.

At this point I don't think Munchkin is ever going to come out. Sigh.

Happy Crafting!

Wild Fire

I took this off our back deck last night. It is the fire in Los Alamos with the sun setting behind it. It is surprisingly very pretty.


Friday, July 1, 2011

Had To Make Them Right Away!

Here are the baby pants. I had to make them right away! I still think I might add some white cuffs with little green buttons. Not sure yet. I used the Basic Baby Pants Pattern from Made By Rae again. So simple!

Fabric, Thread, Patterns, Baby Clothes... Great Day!

I love Jo-Ann's. It is absolutely my favorite craft store. So many awesome sales. I love going there and just touching the different fabrics and yarns. Feeling all the different textures. I must look a little nutty =) Anyway...

Today I went to get some fabric to make baby pants and skirts to match a cute Onesie and a couple little shirts that I had picked up at the thrift store.


I found this adorable green fabric with white polka dots to go with the "I'm Happier Naked" Onesie. It is actually Christmas fabric but I thought it looked generic enough for late summer baby pants.  It was on sale for 50% off so only cost $2.99/yd.  


The other 2 fabrics are 100% Country Cotton Solids. They were on sale for $1.99/yd. I will make a pair of pants and a skirt out of each type of fabric (and still have plenty left over because I am totally incapable of buying just enough fabric for a project.)

I also picked up some thread at 50% off. Sadly my thread collection consisted of white, black and a few shades of red and blue. Now I feel more well rounded. It all fits in my nifty thrift store thread box that I got for $1.


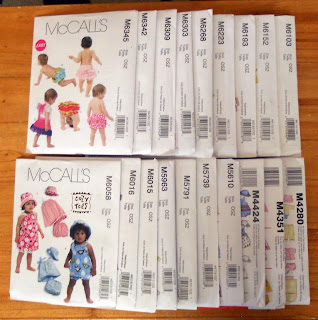
Finally, I got a bunch of baby clothes patterns. They had McCalls on sale for 99¢. I just bought every baby pattern they had. Only $19.00. The only problem with these patterns is that the smallest size on most of them is 13 - 17 lbs. Most will have to wait a while for use. Oh well, I'm prepared! It is kind of annoying that the selection for boys clothes is so limited. I guess one just has to make up for the lack of stylish patterns with awesome fabric choices.


When I went to the doctor yesterday, she poked me a bit and then informed me that my baby was small. I said, "About 7 lbs?" and she replied, "Probably closer 6 lbs." I didn't even buy newborn sized clothes. The babies in my family and Brian's family are always huge. I was the smallest of the lot at 8 lbs 6 ozs. All the others have been over 9 lbs. None of us ever even fit into newborn sized clothes. Today I went out and bought some newborn Onesies. Luckily, at Sears they had an additional 40% off all clearance clothes. I got 15 Carter's Onesies and a little robot sweatshirt and pants set for $20. Deals!

Tuesday, June 28, 2011

Indispensable Little Gadgets... Now That I Have Them

I might be a bit behind, but anyway... I went on a mini shopping spree at Jo-Ann's and got myself some new sewing thingamajigs! Yay! I picked up a few things that I had seen people using in some tutorials online. I never knew I NEEDED these little gadgets until I came home and started using them.

The first thing I got is the Dritz Ball Point Bodkin. (I linked to Amazon for reference but it is actually cheaper to buy at JoAnn's, especially if you have a coupon.) It is a long ball tipped needle with a hole large enough to thread elastic through. I was able to put the elastic in my latest pair of baby pants in about 10 seconds! Never have to use a safety pin again! If you find you are always fighting elastic through a little skinny casing, you should definitely get one of these.


I also discovered the Dritz Magnetic Seam Guide. Again, it is cheaper to go to Jo-Anns and buy, especially with a coupon. It attaches right to the plate on your sewing machine. You just place it at the appropriate distance from your needle and then feed the edge of your fabric against the edge of the seam guide. It is that simple and I have come out with perfectly even seams on everything!

Hope this is helpful to someone!

Happy Crafting!

Thursday, June 23, 2011

Sewing Projects - Baby Clothes!

Hello Everyone!

I found some great tutorials and free patterns online. I found this diaper cover tutorial on the blog Made. This is a great site with tons of free patterns and tutorials for baby and kids clothes. Her patterns are well drafted and come together perfectly. Her instructions are thorough yet concise. I really love this site.  If you like to sew and have any interest in children's clothes, I highly suggest you check it out!


I also made these adorable little Basic Baby Pants. I got the pattern from the blog Made By Rae. Again, everything is 100% cotton. I made the bias tape for the pants with my new Simplicity Bias Tape Maker. I love the pizazz that the printed bias tape gives the finished project. 


I am in the process of making a little shirt to go with the star pants. Will post it when it is done! Hopefully I finish before the Munchkin arrives!
Happy crafting!

Sunday, June 19, 2011

I Got a New Gadget: The Simplicity Bias Tape Maker


Hello All!


I love the finished look that bias tape gives a project but I have always been annoyed by the limited selection of colors. Plus, no prints. This week I got the Simplicity Bias Tape Maker from Amazon.com. I am so glad I did! This little machine enables you to easily make awesome coordinated bias tape. I made 4 different 9 yard lengths in 2 afternoons.  It definitely took me far less time to make the last 2 batches. Once you figure out the process, it flies by rather quickly. 


I used the Bias Tape Tutorial on the blog Made to learn how to prep and cut my fabric.  I used this video on Youtube.com to learn how to use the machine itself. It is incredibly easy to use and makes a very nice finished product. 


One thing to note is that the machine only makes single fold bias tape. If you want double fold bias tape, you have to take the single fold bias tape and fold it in half again lengthwise and press by hand.  I tried running it through the machine again and did not have much luck. It does not take long to press the tape with your iron and I really believe that the results are worth it.


I have only used the 1" tip that came with the machine. It has worked very well. This tip gives you 1" single fold bias tape that results in 1/2" double fold bias tape. I was lucky to find a bunch of other tips on clearance at Joann's for $2 - $3 a piece. I also found 2 of the Winding Buddy 2-Pack's for $3 each.


A few notes on what I have done so far:

  1. Always press and starch the seams thoroughly in the long bias strips before running the fabric through the machine. The first time I used the machine, I was not so consistant and some of the seams got stuck in the roller. The next time I carefully starched and pressed each seam and had no problems.
  2. Always wash and dry your fabric before you make your bias tape. I noticed that the selvedge edge shrinks more than the rest of the fabric and needs to be cut off because it will pull in the edges of your tape at the seams.
  3. Sometimes it is a bit difficult to thread the fabric through the tip. You can easily solve this by using a pin or small scissors to push the fabric through the tip.
  4. I have only used the machine with 100% cotton woven fabric. I have not tried any knits.
  5. Cut up Amazon.com delivery boxes make great bias tape spools =) Re-Use!


If you use a lot of bias tape, this little gadget is definitely worth the price. If you don't, it might not be worth it. However, you might just find that you want to add bias tape to all your projects once you discover how cool it can be! 


Who else has a bias tape maker? What has your experience been? Please share!

Friday, June 10, 2011

Free Baby Apple Beanie Crochet Pattern

Hello Everyone!  Sorry it has taken me so long to post another pattern.  I have had bad problems with my hands swelling and it makes it difficult to crochet. I have also been busy nesting! So much fun. My house is sparkly clean and the nursery is complete! We even finished getting the upstairs bedroom baby-equipped! I have obsessively folded and refolded all my baby clothes (as my MIL predicted.) Good times! Anyway...


Here is My Baby Apple Beanie Crochet Pattern! Hope you enjoy! If you have any questions or comments or find any errors, please contact me at ms.awesome.girl@gmail.com  Thanks and Happy Crocheting!


Available in sizes: Newborn, 0-3 months, 3-6 months, 6-12 months

You can download the PDF here.


Skill Level


Materials

This yarn list is all the yarn I used for all 4 hats. You only need one main color for the apple, a scrap of brown for the stem and a bit of green for the leaf.


1 skein worsted weight yarn in red, green or yellow for apple
Scraps of green and brown worsted weight yarn for stem and leaf
I used Red Heart Soft Yarn in 4608 Wine, 4420 Guacamole, 9523 Dark Leaf
I Love This Yarn 160 Brown
Loops and Threads Impeccable Worsted 01612 Butterscotch
Size I/9 (5.50 mm) crochet hook or size needed to get correct gauge
Yarn needle

This pattern is © Brittany Cole. You may not resell this pattern in whole or in part or claim it as your own. You may sell items created from this pattern locally or online. Please just give me credit as the designer. If you have any questions or find any errors, please contact me at ms.awesome.girl@gmail.com Thanks and happy crocheting!


Monday, June 6, 2011

Sorry for not posting!

Hello all! Sorry I haven't posted anything in a while. My hands have been really swollen and it makes crocheting difficult. One of the many joys of late pregnancy =) I do have some patterns being tested and I will put them up as soon as they are complete. Thank you all for your patience! Hope you have a great week!

Tuesday, May 24, 2011

Free Adult Spikes Hat Crochet Pattern


You can download the PDF here.


I have decided that it is a bit redundant to post the entire pattern on the post and then offer a PDF. If you do not have Adobe Reader, you can download it here (legally) for free. Who wants to copy and paste and then print anyway?  If you still have trouble downloading the PDF, please email me at ms.awesome.girl@gmail.com.


Hello Everyone! Thank you all for checking my blog. I hope you enjoy this pattern. It comes with both adult woman (20") and adult man (22") sizes.  It is crocheted with 2 colors of aran weight yarn with a recommended I hook.


I have made both sizes, but there still might be some errors. If you find one, please contact me at ms.awesome.girl@gmail.com Thanks!


Feel free to sell items made from this pattern. Please just credit me, Brittany Cole, as the designer and put a link back to my blog http://crafty-woman.blogspot.com/  If you have any questions, comments, or find any errors, please contact me at ms.awesome.girl@gmail.com Thanks and Happy Crocheting!

Saturday, May 21, 2011

Chain Free Crochet

I learned a new crocheting technique today!  I often feel that after doing something for so long, new ideas are few and far between. So, yay for learning something new!

I am really happy that I just found this site.  It teaches how to do chain free crochet.  This technique gives the edge of your work the ability to stretch, unlike when you start with a chain.  I think this will make it much easier to create hats that are worked from the brim up because you won't have that tight chain at the bottom.  

There are pages that teach no chain single crochet, half double crochet and double crochet.


Hope someone else finds this useful!

Thanks for looking and happy crocheting!

Tuesday, May 17, 2011

Pretty 6 Petal Flower


Here is my pattern for the Pretty 6 Petal Flower. 


You can download the PDF here


Please feel free to add this flower to your own patterns for hats, bags, etc. Please just credit me, Brittany Cole, as the designer and put a link back to my blog http://crafty-woman.blogspot.com/  If you have any questions, comments, or find any errors, please contact me at ms.awesome.girl@gmail.com Thanks and Happy Crocheting!

Pretty 6 Petal Flower


Skill Level


Materials

You can make these from scrap yarn of any gauge! Clear out that stash!
Any hook you want. Match it to your yarn.  You can make these flowers any size.
Yarn needle

Abbreviations

ch - chain
dc - double crochet
sc - single crochet
sl st - slip stitch
sp - space
st(s) - stitch(es)
tr - triple crochet

Pattern Notes

  • This pattern in written in American English terminology.
  • Instructions in *stars* are repeated the number of times indicated after the second *.


Instructions

Petals

Foundation Row: Make a magic ring. (Or ch 6 and join with sl st.) Ch 1. *Sc in loop. Ch 5* 6 times. Join with sl st to first sc. If you used a magic ring, pull the loop tight. (6 ch-5 sp)
Row 1: Sl st into first ch-5 sp. Ch 4. (Counts as tr.) 11 tr in same sp. *12 tr in next ch-5 sp* 5 times. Join with sl st to 4th ch of ch 4. Fasten off. Leave a long (12”) tail.

1) With the tail, catch the post of the first and the last tr of each petal. You will have 2 sts on one side of the yarn (the last stitch of one petal and the first stitch of the next petal) and 10 on the other side, 2 sts on the one side, 10 sts on the other side, etc.


2) Once  you have caught all 12 posts, pull until you can not see the yarn tail, but you still have a nice open space in the center. You can weave in the end or use it to attach the flower.

Center

Row 1: Ch 10. Dc in 3rd ch from hook and each st across. Fasten off. Leave 8” tail.  
For some of the smaller yarns, I made a shorter chain and sc instead of dc because the dc’s were to tall.

Use the tail to join the piece into a loop by sewing down the edges. Sew along the bottom, along the foundation chain, and pull tight to make a little bowl.


Leaves

Foundation Chain: Ch 12
Row 1: Sc in 2nd ch from hook. Hdc in next st. 2 dc in next st. Tr in next st. 2 Tr in next st. Tr in next st. Dc in next 2 sts. Hdc in next st. Sc in next st.  5 sc in last sc.

Now you will work around the end of the chain onto the back, unused loops of the foundation chain.


Sc in next st. Hdc in next st. Dc in next 2 sts. Tr in next st. 2 tr in next st. Tr in next st. 2 dc in next st. Hdc in next st. Sc in last st. Ch 1. Sl st into first sc and fasten off with a tail long enough to attach to your project.


Construction
Use the remaining length of yarn on the flower center to attach the center to the hole in the middle of the petals. Secure and weave in ends. Attach leaves where desired. Weave in ends.


Sunday, May 15, 2011

New Patterns Soon... I promise!!!

I have a few new patterns that will be coming out soon. I have so many ideas and I have to make each one right away so it doesn't fly away. I am just behind on testing =) I don't like to put anything up until it has been made at least twice.  Right now I have the Chain Link Hat, a purse, the Spikes Hat in Newborn to adult sizes and a cool iPad case all written and in the testing process.  Thank you all for your patience! Hope everyone has a great week!


Wednesday, May 11, 2011

Coming Soon - Chain Link Hat Pattern


Should be here in the next week or so.  Just doing final testing! Any comments?  Sorry the pics don't show the chain links very well. They look much better in person!

Tuesday, May 10, 2011

Thanks to everyone who volunteered!

Thank you everyone who volunteered to test patterns for me! I believe I have enough people at this point. I cannot create patterns fast enough for any more people!

Special thanks to Beckey, Stephanni and Amanda!

Hope everyone has a great day and happy crafting!

Monday, May 9, 2011

Free Slouchy Cross Stitch Bobble Beret

Please enjoy my pattern! If you find any errors or have any questions, please contact me at ms.awesome.girl@gmail.com. Thanks and happy crocheting!

If you would like to download the PDF you can click here.


Materials

1 skein size 4 worsted weight yarn (I used Caron Simply Soft in Berry Blue 9609)
Size J (6.00 mm) crochet hook or size needed to get correct gauge
Yarn needle


Gauge

6 sts = 2“ in sc
Row gauge is not important because it is a slouchy hat and you can make it as long as you would like.

Approximate Finished Dimensions

adult - 20” brim diameter x 12” height

Abbreviations

ch - chain
dc - double crochet
mb- make bobble
rs - right side
rsc - reverse single crochet
sc - single crochet
sc2tog - single crochet 2 stitches together
sl st - slip stitch
st(s) - stitch(es)
ws - wrong side
xst - cross stitch

Pattern Notes
This pattern in written in American English terminology.
Rounds are joined with a slip stitch. You will only turn the work when specified in the pattern. You will not turn the rest of the rows.
When you “Ch 2” at the beginning of a dc row, it does not count as a dc. When you join with a sl st at the end of a row be sure to join to the top of the first dc and not to the ch-2. If you are not careful about this, you will add stitches to your rounds.
After turning, when you crochet in the same st, it will seem like you are crocheting to the right a bit. This is correct. Also make sure not to crochet in the slip stitch you used to join the previous row. If you do, you will be adding stitches to your row.
Instructions in *stars* are repeated the number of times indicated after the second *.
If you are not familiar with the magic loop, here is a good tutorial to learn the technique http://www.crochetme.com/forums/t/28917.aspx If you are still not comfortable with the technique you can “Ch 2. 6 sc in second chain from hook. Join with a sl st.” instead.

Special Stitches

mb - make bobble - Yarn over and insert hook into designated stitch. Yarn over and draw a loop through the stitch. Yarn over and draw through 2 loops on the hook. You will now have 2 loops still on your hook. *Yarn over and insert hook into same stitch. Yarn over and draw a loop through the stitch. Yarn over and draw through 2 loops on the hook* 2 times. You will now have a total of four loops on the hook. Yarn over and draw through all 4 loops.

rsc - reverse single crochet - You will be crocheting from left to right when doing this stitch. It it takes a bit to get used to it. Insert hook into stitch to the right of current stitch. Yarn over and draw through stitch. Yarn over and draw through both loops on hook.

xst - cross stitch - Skip one st. Dc in next st. Dc in skipped stitch. This counts as 2 stitches.

Variations

You can make this hat longer by repeating rows 10 - 13 more times. Make sure to end on row 12 if you decide to add repeats.
You can also make this hat with aran weight yarn. The fabric will be stiffer and the hat will be a bit bulkier. The red hat is made with I Love This yarn from Hobby Lobby in #50 Cranberry.

Instructions

Foundation row: Form a magic loop. 6 sc in loop. Pull tight. Join with sl st to first sc. (6 sts)
Row 1: RS. Ch 1. 2 sc in same st. 2 sc in each st around. Join with sl st to first sc. (12 sts)
Row 2: Ch 1. Sc in same st. 2 sc in next st. *sc in next st, 2 sc in next st* 5 times. Join with sl st to first sc. (18 sts)
Row 3: Ch 1. Sc in same st. Sc in next st. 2 sc in next st. *sc in next 2 sts, 2 sc in next st* 5 times. Join with sl st to first sc. (24 sts)
Row 4: Ch 1. Sc in same st. Sc in next 2 sts. 2 sc in next st. *sc in next 3 sts, 2 sc in next st* 5 times. Join with sl st to first sc. TURN. (30 sts)
Row 5: WS. Ch 1. Sc in same st, mb in next stitch. *Sc in next st, mb in next st* 14 times. Join with sl st to first sc. (30 sts = 15 bobbles and 15 sc)
Row 6: Ch 2. Dc in same st. 2 dc in next st. *Dc in next st. 2 dc in next st* 14 times. Join with sl st to first dc. (45 sts)
Row 7: Ch 2. Dc in same st. Dc in next st. 2 dc in next st. *Dc in next 2 sts. 2 dc in next st* 14 times. Join with sl st to first dc. (60 sts)
Row 8: Ch 1. Sc in same st, mb in next stitch. *Sc in next st, mb in next st* 29 times. Join with sl st to first sc. TURN. (60 sts = 30 bobbles and 30 sc)
Row 9: RS. Ch 1. Sc in same st. Sc in next 3 sts. 2 sc in next st. *Sc in next 4 sts. 2 sc in next st* 11 times. Join with sl st to first dc. (72 sts)
Row 10: Ch 2. Dc in next st. Dc in skipped st with ch-2. Xst 35 times. Join with sl st. (72 sts)
Row 11: Ch 1. Sc in same st and each st around. Join with sl st to first sc. TURN. (72 sts)
Row 12: WS. Ch 1. Sc in same st, mb in next stitch. *Sc in next st, mb in next st* 35 times. Join with sl st to first sc. TURN. (72 sts = 36 bobbles and 36 sc)
Row 13: RS. Ch 1. Sc in same st and each st around. Join with sl st to first sc. (72 sts)
Rows 14 - 28: Repeat rows 10 - 13 three times and then rows 10 through 12 one more time.
Row 29: RS. Ch 1. Sc in same st. Sc in next 9 sts. Sc2tog. *Sc in next 10 sts. Sc2tog* 5 times. Join with sl st to first sc. (66 sts)
Row 30: Ch 2. Dc in next st. Dc in same st as ch-2. Xst 32 times. Join with sl st. (66 sts)
Row 31: Ch 1. Sc in same st. Sc in next 8 sts. Sc2tog. *Sc in next 9 sts. Sc2tog* 5 times. Join with sl st to first sc. TURN. (60 sts)
Row 32: WS. Ch 1. Sc in same st, mb in next stitch. *Sc in next st, mb in next st* 29 times. Join with sl st to first sc. TURN. (60 sts = 30 bobbles and 30 sc)
Rows 33 - 37: RS. Ch 1. Sc in same st and each st around. Join with sl st to first sc. (60 sts)
Row 38: Ch 1. Rsc in each st around. Fasten off and weave in ends. (60 sts)


This pattern is © Brittany Cole. You may not resell this pattern in whole or in part or claim it as your own. You may sell items created from this pattern locally or online. Please just give me credit as the designer. If you have any questions or find any errors, please contact me at ms.awesome.girl@gmail.com Thanks and happy crocheting!